Tutorial: Writing a NinjaTrader 8 Inside Bar Indicator

In this tutorial, we are going to create a simple indicator to practically demonstrate the point I was trying to make in the previous article (Is automating your trading easy?). We are going to create a simple inside bar indicator for NinjaTrader 8.
The indicator will color orange the inside bar that has three rising bars (bars that make higher highs and higher lows) preceding it.
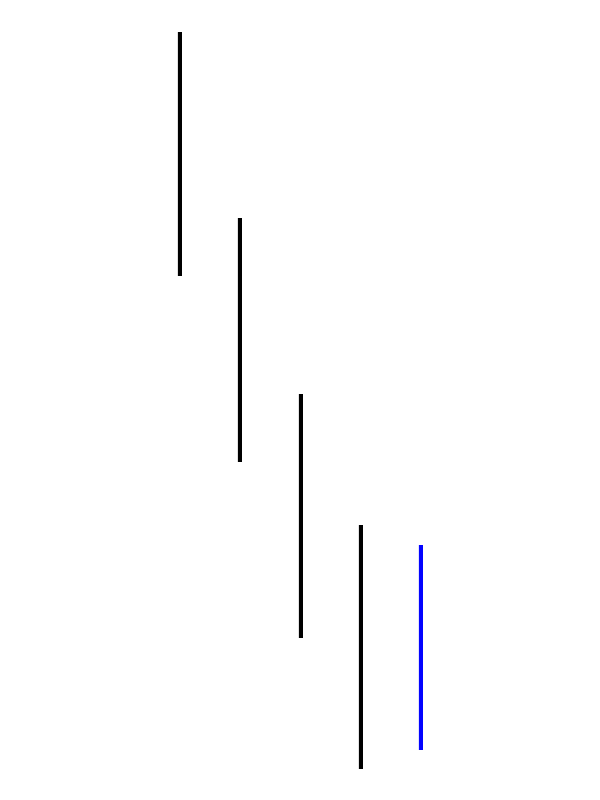
The indicator will color blue the inside bar that has three falling bars (bars that make lower lows and lower highs).
Let's assume that the client imagined this when he asked for this indicator. Do you think the rules above are enough?

Creating the indicator using the Wizard
Anyway, let's create this indicator for NinjaTrader 8 to see what happens.
First, we need to open the NinjaScript Editor (New -> NinjaScript Editor)

Then right-click the Indicators on the Indicators folder in the NinjaScript Editor and choose New Indicator.

Using the New Indicator Wizard, we will enter the values as follows:
General Page:
Name TradingDJInsideBar
Description A simple Inside Bar Indicator preceded by three bars that make consecutive lower lows and lower highs or consecutive higher lows and higher highs.
Default Properties Page:
Calculate: On bar close
Overlay on price: Checked
More properties: Uncheck all checkboxes
Additional Data Page:
Leave all empty
Additional Event Methods Page:
Leave all checkboxes unchecked
Input Parameters Page:
Leave empty
Plots and Lines Page:
Leave empty
Once done, click Finish to see the plain Indicator tab opened in the editor.
The Inside Bar indicator logic
There are several ways to write the logic of an indicator. The one that may look simple at the beginning is checking if the current bar is an inside bar, and the preceding three bars are making lower highs and lower lows. In this case, the code would look like this:
bool isIBPrecededByFallingBars = High[0] <= High[1] && Low[0] >= Low[1]
                                && High[1] < High[2] && Low[1] < Low[2]
                                && High[2] < High[3] && Low[2] < Low[3]
                                && High[3] < High[4] && Low[3] < Low[4];
I prefer to break the problem down in smaller parts. In this example, at every bar, we will calculate and check the number of consecutive falling and rising bars. If this number is equal or greater than three, then we will check if the current bar is an inside bar.
First, we are going to declare the two variables that we will use for counting the rising and falling bars. We will also use a constant to keep the minimum number of consecutive rising or falling bars preceding the inside bar.

#region Variables
//Will keep the number of rising bars
private int risingBarsCount;
//Will keep the number of falling bars
private int fallingBarsCount;
//The number of minimum consecutive rising or falling bars preceding the inside bar
private const int minimumConsecutiveBars = 3;
#endregion
Then we are going to initialize the two variables inside the OnStateChange() method.

risingBarsCount = 0;
fallingBarsCount = 0;
Now we can create three private methods that will do the calculation, and then we will call these methods inside OnBarUpdate() method.
protected override void OnBarUpdate()
{
    // Since the calculations require that there be at least one previous bar
    // we'll need to check for that and exit if this is the first bar.
    if (CurrentBar < 1)
    {
        return;
    }

    checkForInsideBar();
    manageRisingBars();
    manageFallingBars();
}

private void checkForInsideBar()
{
    if(risingBarsCount >= minimumConsecutiveBars
        && High[0] <= High[1] && Low[0] >= Low[1])
    {
        //Here goes the logic for the pattern Inside Bar and minimumConsecutiveBars rising bars
        //We will simply set the color of the inside bar blue
        BarBrush = Brushes.Orange;
    }

    if(fallingBarsCount >= minimumConsecutiveBars
        && High[0] <= High[1] && Low[0] >= Low[1])
    {
        //Here goes the logic for the pattern Inside Bar and minimumConsecutiveBars falling bars
        //We will simply set the color of the inside bar blue
        BarBrush = Brushes.Blue;
    }
}

private void manageRisingBars()
{
    if(High[0] > High[1] && Low[0] > Low[1])
    {
        risingBarsCount++;
    }
    else
    {
        risingBarsCount = 0;
    }
}

private void manageFallingBars()
{
    if(High[0] < High[1] && Low[0] < Low[1])
    {
        fallingBarsCount++;
    }
    else
    {
        fallingBarsCount = 0;
    }
}
Now let's compile the indicator, and then let's take a look at the chart. The indicator does exactly what we asked (programmed) it to do.

As I said in the previous article, we may want to add some additional logic, to avoid situations like this.

You can download the source code and the compiled version on GitHub.

